Quickstart
This quickstart guide is intended to help you get your first deployment running on Konan in no time. The two main steps required to get your first deployment on Konan are:
- Preparing your model for the deployment
- Deploying it on Konan.
Throughout the step 1, you'll be using the Konan template deployments project which contains the necessary logic to create a deployment. You'll be asked to override certain functions with your own logic when needed. In step 2, you will deploy what you created in step 1 through the Konan portal, you'll need to register an account in Konan for that.
This guide will primarily focus on a python implementation. However, Konan can be integrated with any framework. If the programming language you intend to use is not currently supported in the template project, you can follow Create a Konan Compatible ML Webservice to see a detailed step-by-step guide to deploy your model on Konan.
If, instead, you'd rather use a ready-made model to test Konan with, skip this entire section and head over to using ready-made examples.
Prerequisites
You should have the following installed:
Preparing Model for Deployment
1. Konan Template Deployments Repo
Clone the repo:
git clone https://github.com/SynapseAnalytics/konan-template-deployments.git
Then, navigate to the python folder inside the repo:
cd konan-template-deployments
cd python
2. Python Source Code
Override the steps marked by # TODO in src/server.py file with your own logic:
MyPredictionRequestclass MyPredictionRequest(KonanServiceBasePredictionRequest):
"""Defines the schema of a prediction request
Follow the convention of <field_name>: <type_hint>
Check https://pydantic-docs.helpmanual.io/usage/models/ for more info
"""
# TODO: [1] Define your request schema
# Uncomment what you need and adjust their names and types
# Check https://pydantic-docs.helpmanual.io/usage/models/ for more data types
# sample_str: str
# sample_int: int
passMyPredictionResponseclass MyPredictionResponse(KonanServiceBasePredictionResponse):
"""Defines the schema of a prediction response
Follow the convention of <field_name>: <type_hint>
Check https://pydantic-docs.helpmanual.io/usage/models/ for more info
"""
# TODO: [2] Define your response schema
# Uncomment what you need and adjust their names and types
# Check https://pydantic-docs.helpmanual.io/usage/models/ for more data types
# sample_int: int
# sample_bool: bool
# sample_float: float
# sample_str: str
# sample_list_of_ints: List[int]
# sample_dict: Dict[str, Any]
# If you want your fields to be nested objects themselves
# class SampleObject(pydantic.BaseModel):
# sample_field_1: int
# sample_field_2: str
# sample_object: SampleObject
passMyModel.__init__()def __init__(self):
"""Add logic to initialize your actual model here
Maybe load weights, connect to a database, etc ..
"""
super().__init__()
# TODO: [3] Initialize your model
# # For example, the following code will load a model saved as a model.pickle file in the models/ directory
# import pickle
# from konan_sdk.konan_service import constants as Konan_Constants
# self.loaded_model = pickle.load(open(f"{Konan_Constants.MODELS_DIR}/model.pickle", 'rb'))MyModel.predict()def predict(self, req: MyPredictionRequest) -> MyPredictionResponse:
"""Makes an intelligent prediction
Args:
req (MyPredictionRequest): raw request from API
Returns:
MyPredictionResponse: this will be the response returned by the API
"""
# TODO: [4] Implement your prediction logic
# Optionally preprocess the request here
# Use your logic to make a prediction
# Create a MyPredictionResponse object using kwargs
sample_prediction = MyPredictionResponse(
# sample_int=42,
# sample_bool=False,
# sample_float=0.68,
# sample_str="hello world",
# sample_list_of_ints=[10, 2, 3],
# sample_dict={
# 'key_1': 'value_1',
# 'key_2': 2,
# },
# sample_object=MyPredictionResponse.SampleObject(
# sample_field_1=1,
# sample_field_2='field_2',
# ),
)
# Optionally postprocess the prediction here
return sample_predictionMyModel.evaluate()For
konanto frequently evaluate your model, you need to define theMyModel.evaluate()method. At its essence, this method accepts aListcontaining past predictions generated by the model alongside their corresponding ground truth values. The method should then return an "evaluation" of the model's performance using a "metric".Check the documentation of
konan-sdkfor details on the implementation of theKonanServiceBaseEvaluateRequestandKonanServiceEvaluateResponseclasses.def evaluate(self, req: KonanServiceBaseEvaluateRequest) -> KonanServiceBaseEvaluateResponse:
"""Evaluates the model based on passed predictions and their ground truths
Args:
req (KonanServiceBaseEvaluateRequest): includes passed predictions and their ground truths
Returns:
KonanServiceEvaluateResponse: the evaluation(s) of the model based on some metrics
"""
# TODO: [5] Implement your evaluation logic
# Use your logic to make an evaluation
# Create a KonanServiceBaseEvaluateResponse object using kwargs
sample_evaluation = KonanServiceBaseEvaluateResponse(
# results should be a list of KonanServiceEvaluation objects
# define each KonanServiceEvaluation object using kwargs
results=[
# KonanServiceEvaluation(
# metric_name=KonanServicePredefinedMetricName.precision,
# metric_value=0.95,
# ),
# KonanServiceEvaluation(
# metric_name="custom-metric",
# metric_value=0.7,
# ),
],
)
return sample_evaluations
3. Python Required Packages
Append your required dependencies to requirements.txt file:
konan-sdk
# Add your python requirements here
4. Environment Variables
Adjust the .konan environment variables file:
KONAN_CONTAINER_REGISTRY:A "container registry" is where the model's container image will be pushed.
If you don't already have an account with a container registry, use
konan.azurecr.ioasKONAN_CONTAINER_REGISTRY. For more details, check out Konan's Container Registry (KCR).# Possible values include: docker.io, quai.io, registry.gitlab.com and konancr.azurecr.io
KONAN_CONTAINER_REGISTRY={container-registry}KONAN_CONTAINER_REGISTRY_USERNAMEandKONAN_CONTAINER_REGISTRY_PASSWORD:# Your credentials for the above container registry
KONAN_CONTAINER_REGISTRY_USERNAME={registry-username}
KONAN_CONTAINER_REGISTRY_PASSWORD={registry-password}
If you used KCR in the previous step, you would need to have signed up in Konan and joined an organization in order to be able to obtain your KCR credentials.
KONAN_CONTAINER_REGISTRY_NAMESPACEIf you are using KCR, then this variable is required. You can retrieve it from the KCR page in your dashboard.
Otherwise, the variable is optional, and will default to your
KONAN_CONTAINER_REGISTRY_USERNAME.
# Container registry namespace to push images to
# Required for the KONAN_CONTAINER_REGISTRY konancr.azurecr.io. You can find it from the Konan Dashboard, under KCR.
# Optional for other KONAN_CONTAINER_REGISTRY values. Will default to KONAN_CONTAINER_REGISTRY_USERNAME if unset

# Uncomment the following line if you need to define KONAN_CONTAINER_REGISTRY_NAMESPACE
# KONAN_CONTAINER_REGISTRY_NAMESPACE={registry-namespace}KONAN_APP_NAMEandKONAN_APP_VERSION:# Naming and versioning your application
KONAN_APP_NAME=test-app
KONAN_APP_VERSION=v0.0.1a
5. Docker Image
Build, tag, and push the docker image for your deployment:
make release
Creating Deployment on Konan
Konan Container Registry (KCR)
In the previous section, you were asked to push the final image either to a container registry of your choice or use the container registry provided by Konan. In case you opted for the latter, go to https://app.konan.ai/KCR to get your KCR credentials.
In the bottom section, click reveal credentials to get the username and password you need for login. In a terminal, execute the commands shown and only fill in your image name and tag in place of <image>:<tag>, all other fields should be auto-filled after revealing your credentials.
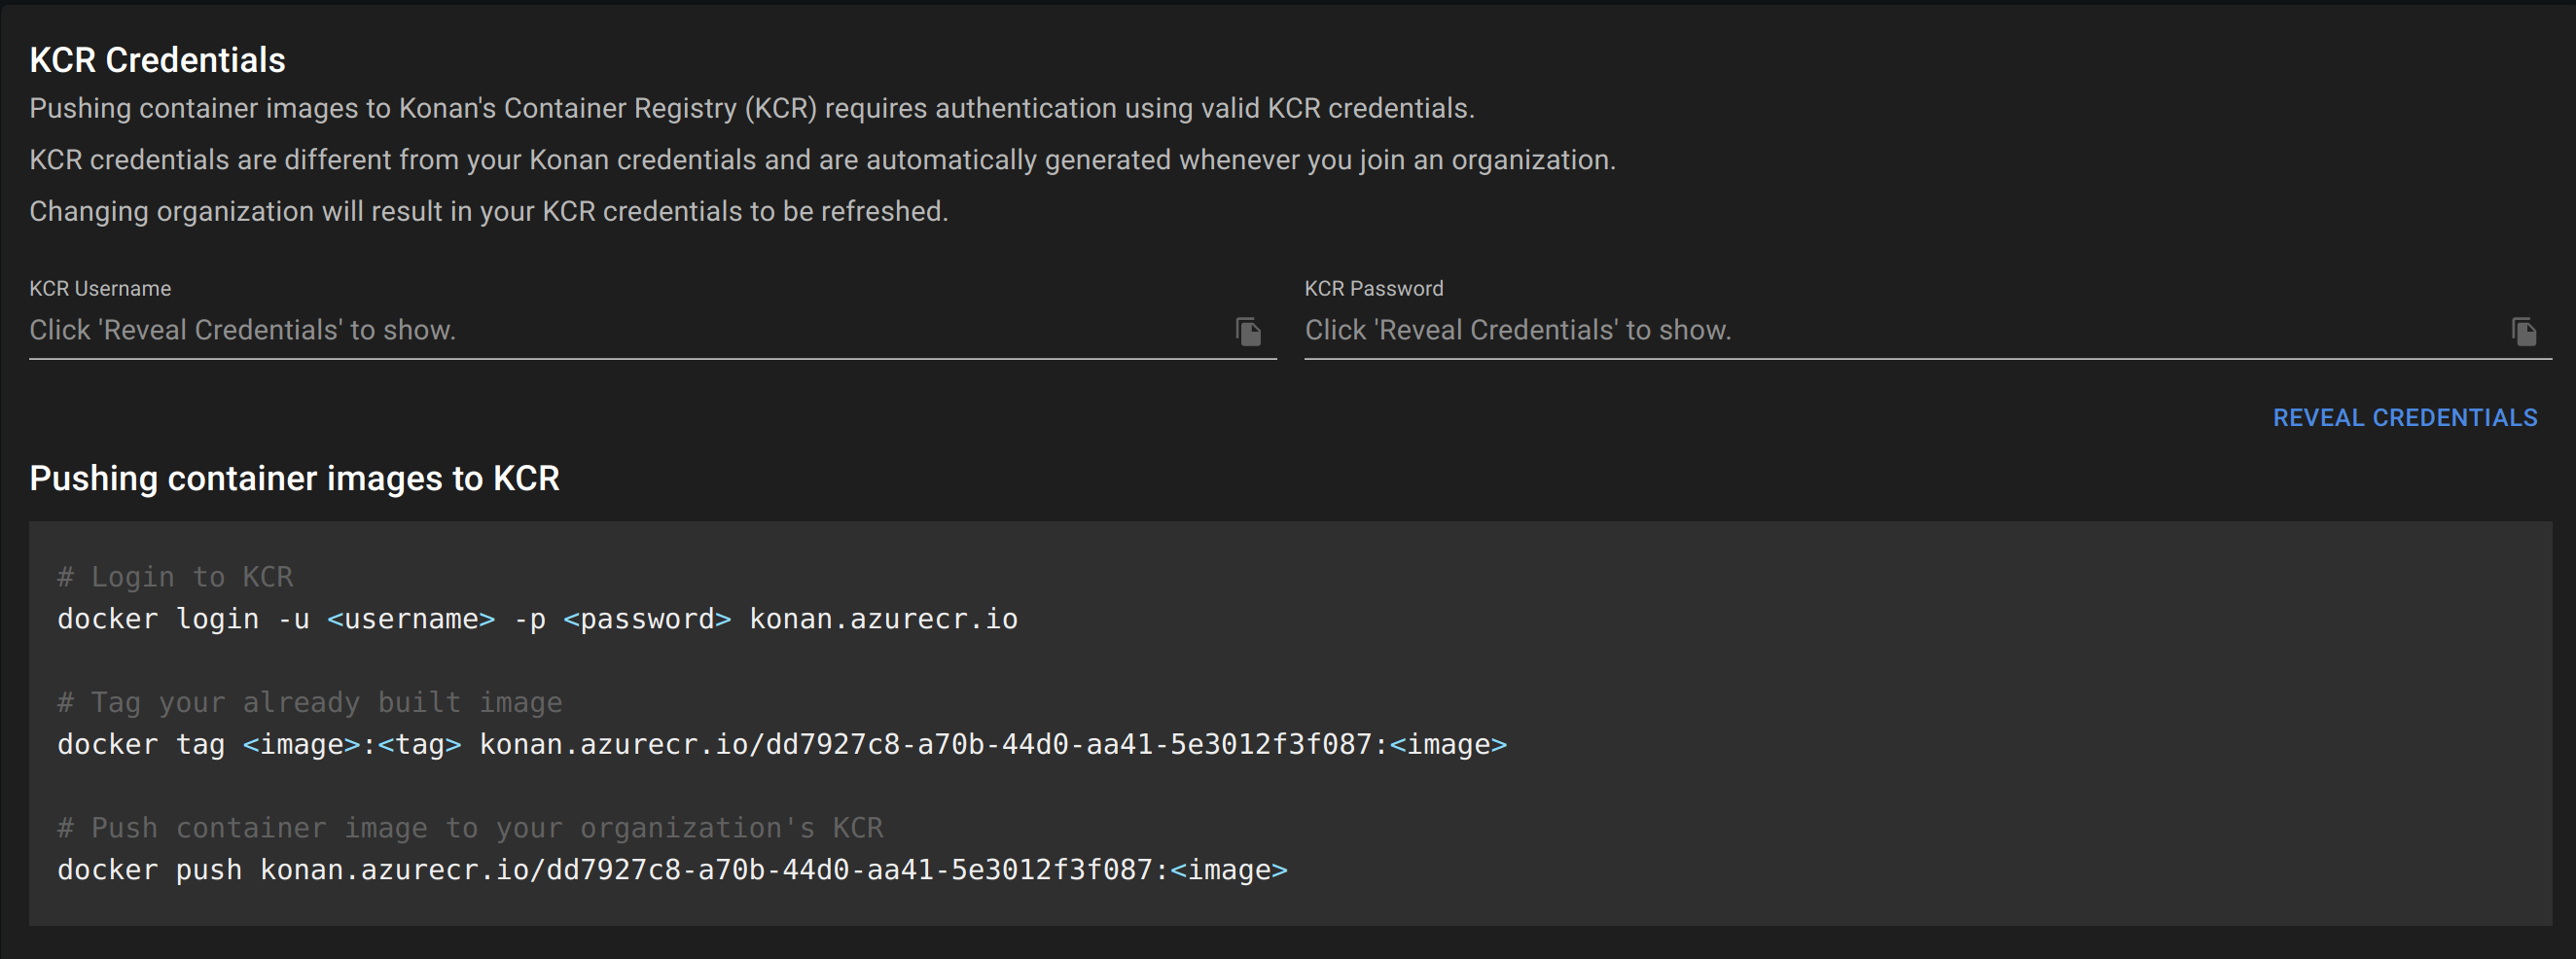
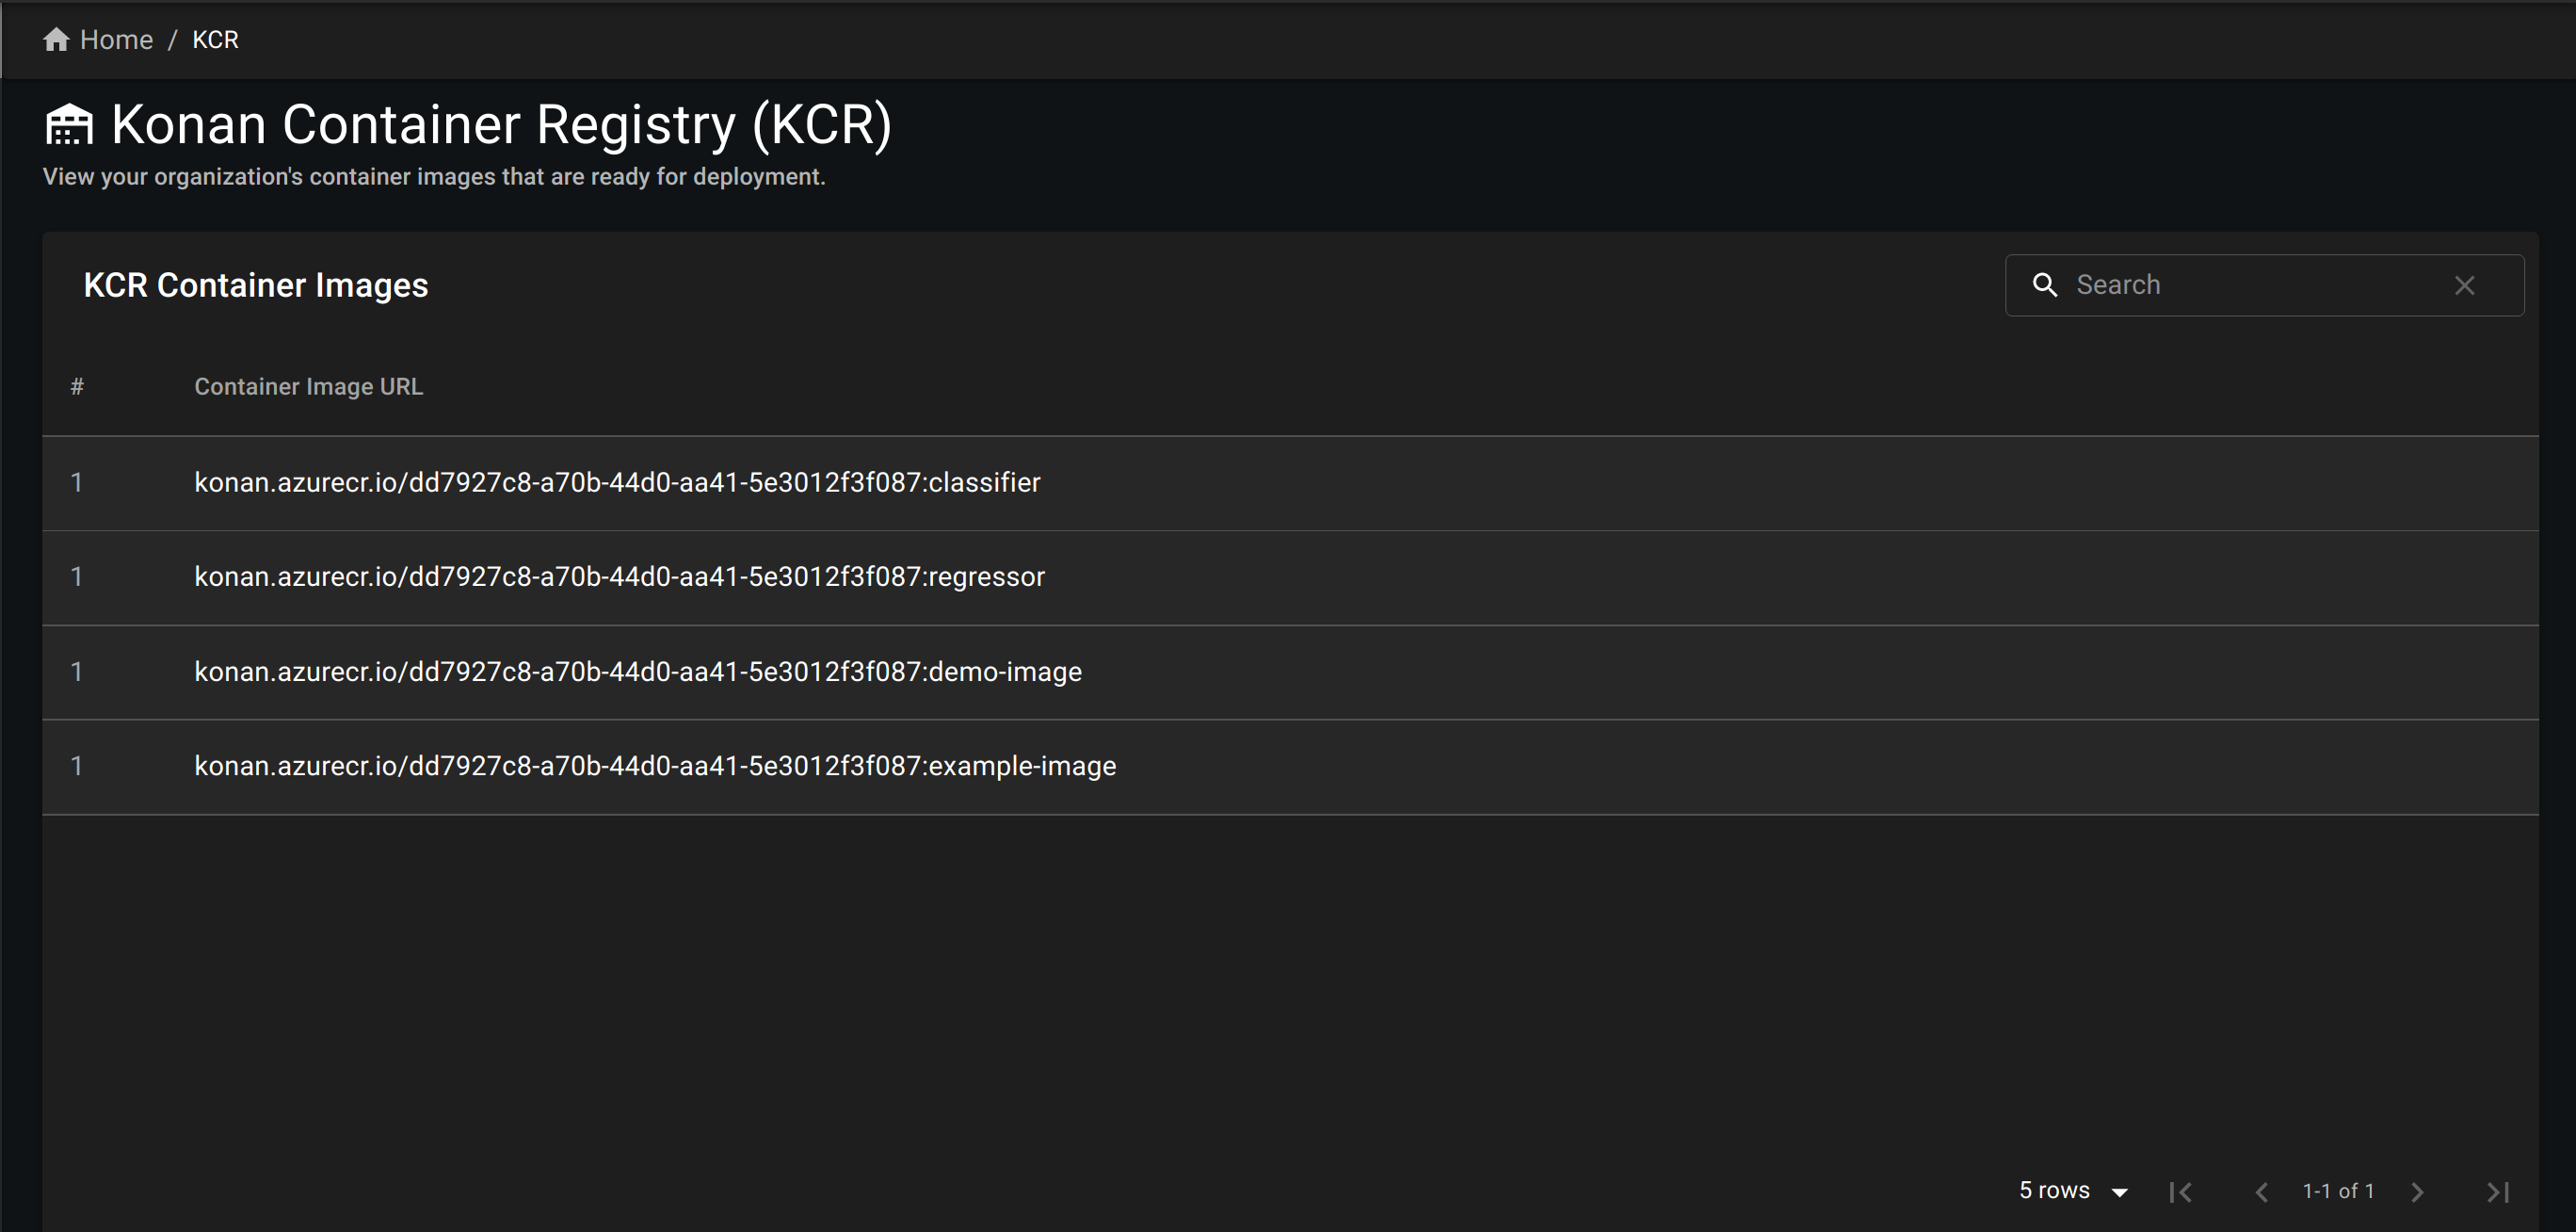
After execute the docker push command, you should see all images pushed by members of your organization under KCR Container Images. You'll be able to browse them while creating a deployment.
Deployments Page
The deployments page is where you can create, view and delete your deployments.
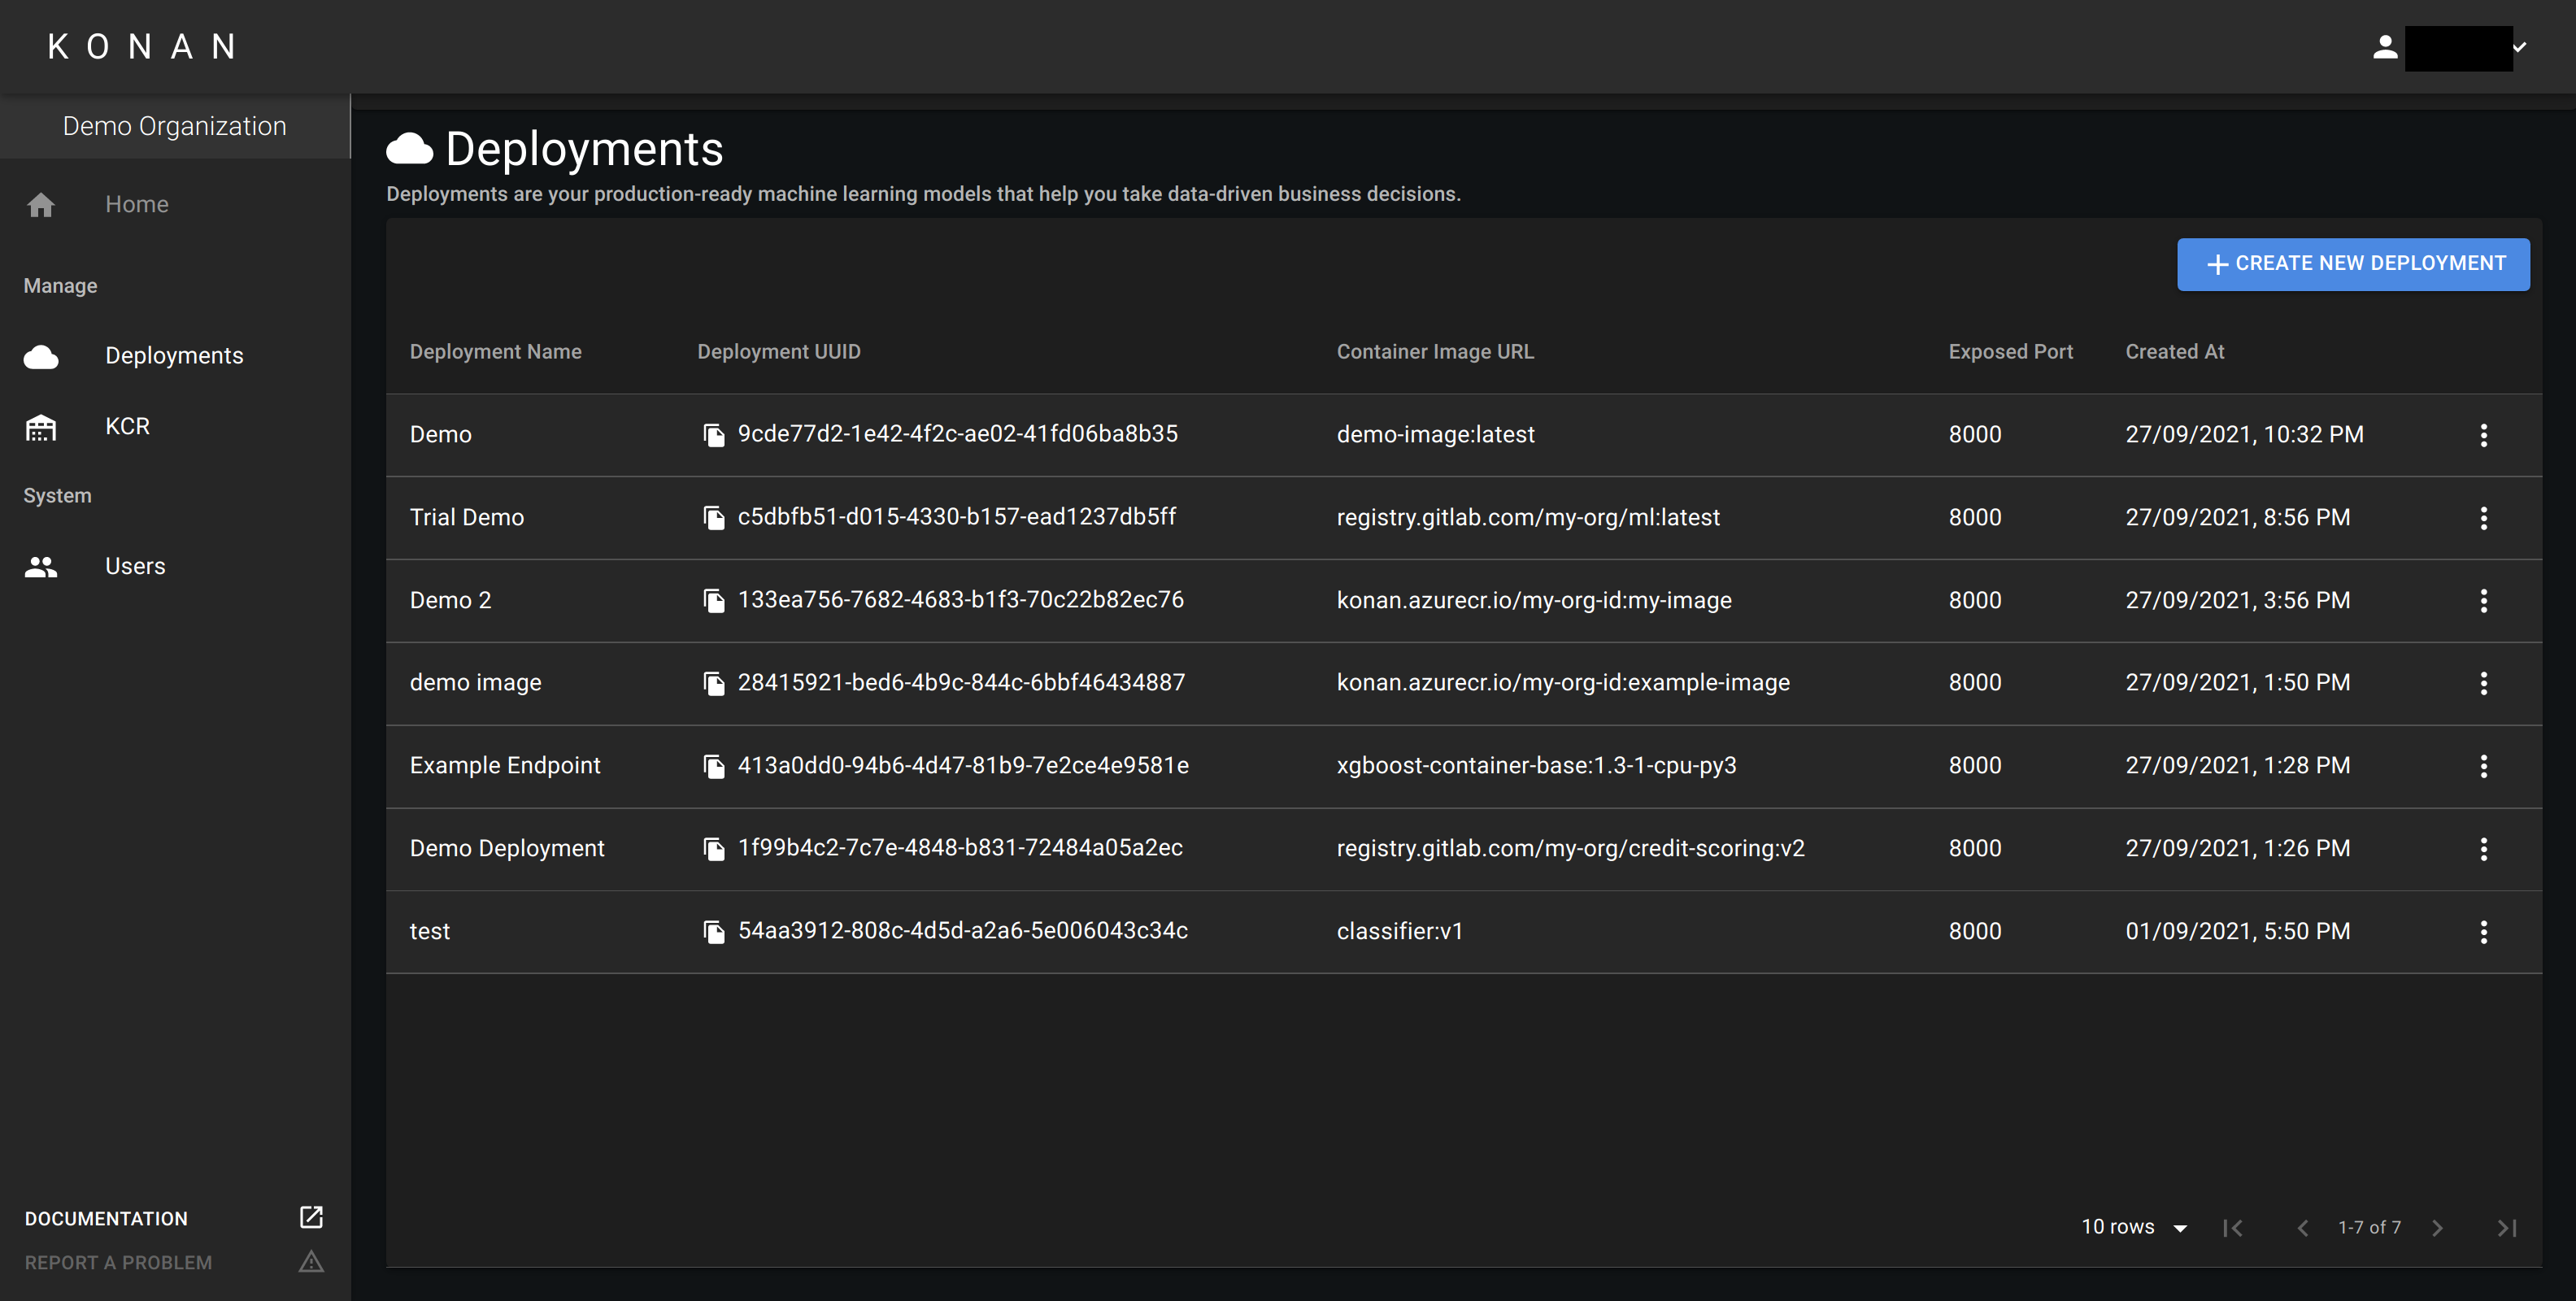
Create Deployment
In the deployments page, create a new deployment. The following dialogue will appear:
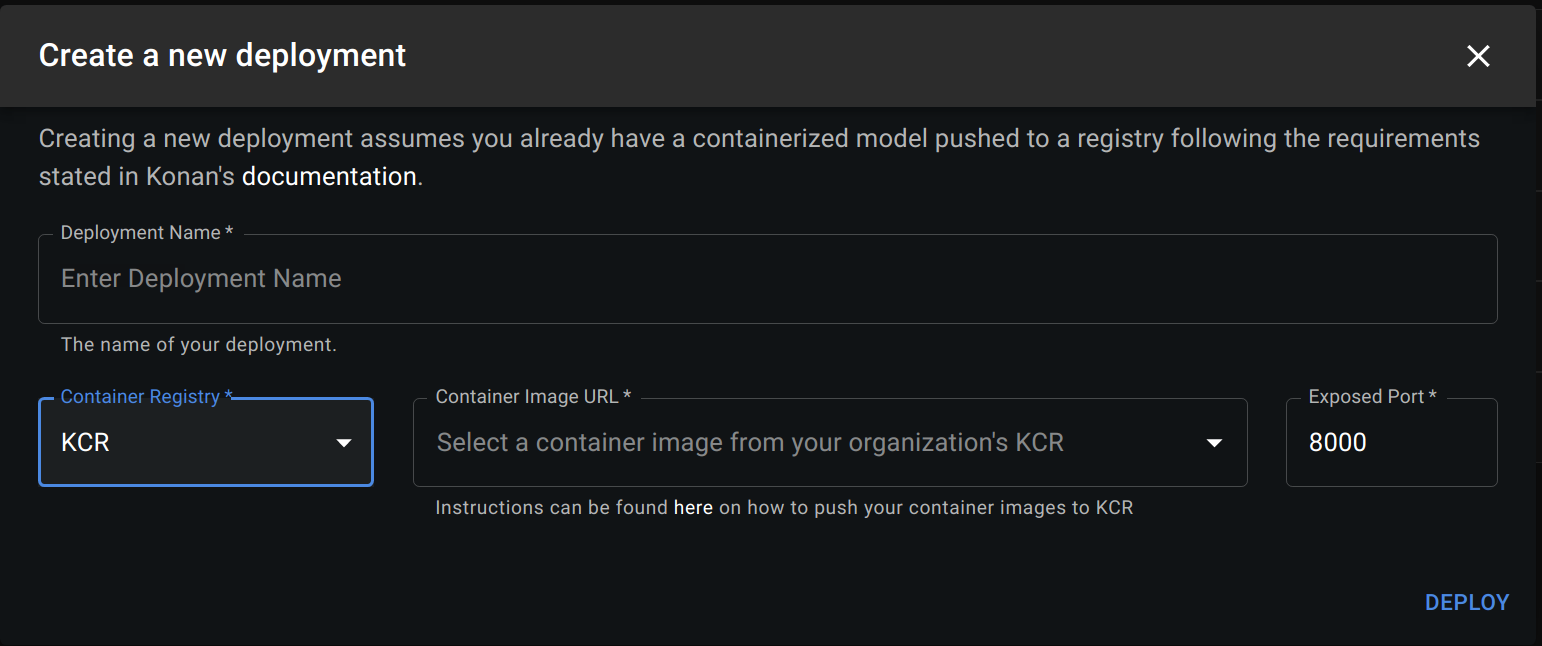
Fill in the following details about your deployment:
- Deployment Name: The name of your deployment.
- Container Registry: Select KCR if you pushed you image there or Custom otherwise.
- Container Image URL:
- If you selected KCR, browse the list of images you pushed and select the one you want to deployed
- If you selected Custom, enter the url of the docker image you created in containerization section. The link should follow this format:
<registry>/<image-name>:<tag>
- Exposed Port: The port Konan should use to communicate with your deployment. This should be the same port exposed in the dockerfile you created here.
- Registry Username: This is only needed if pulling the image requires authentication.
- Registry Password: This is only needed if pulling the image requires authentication.
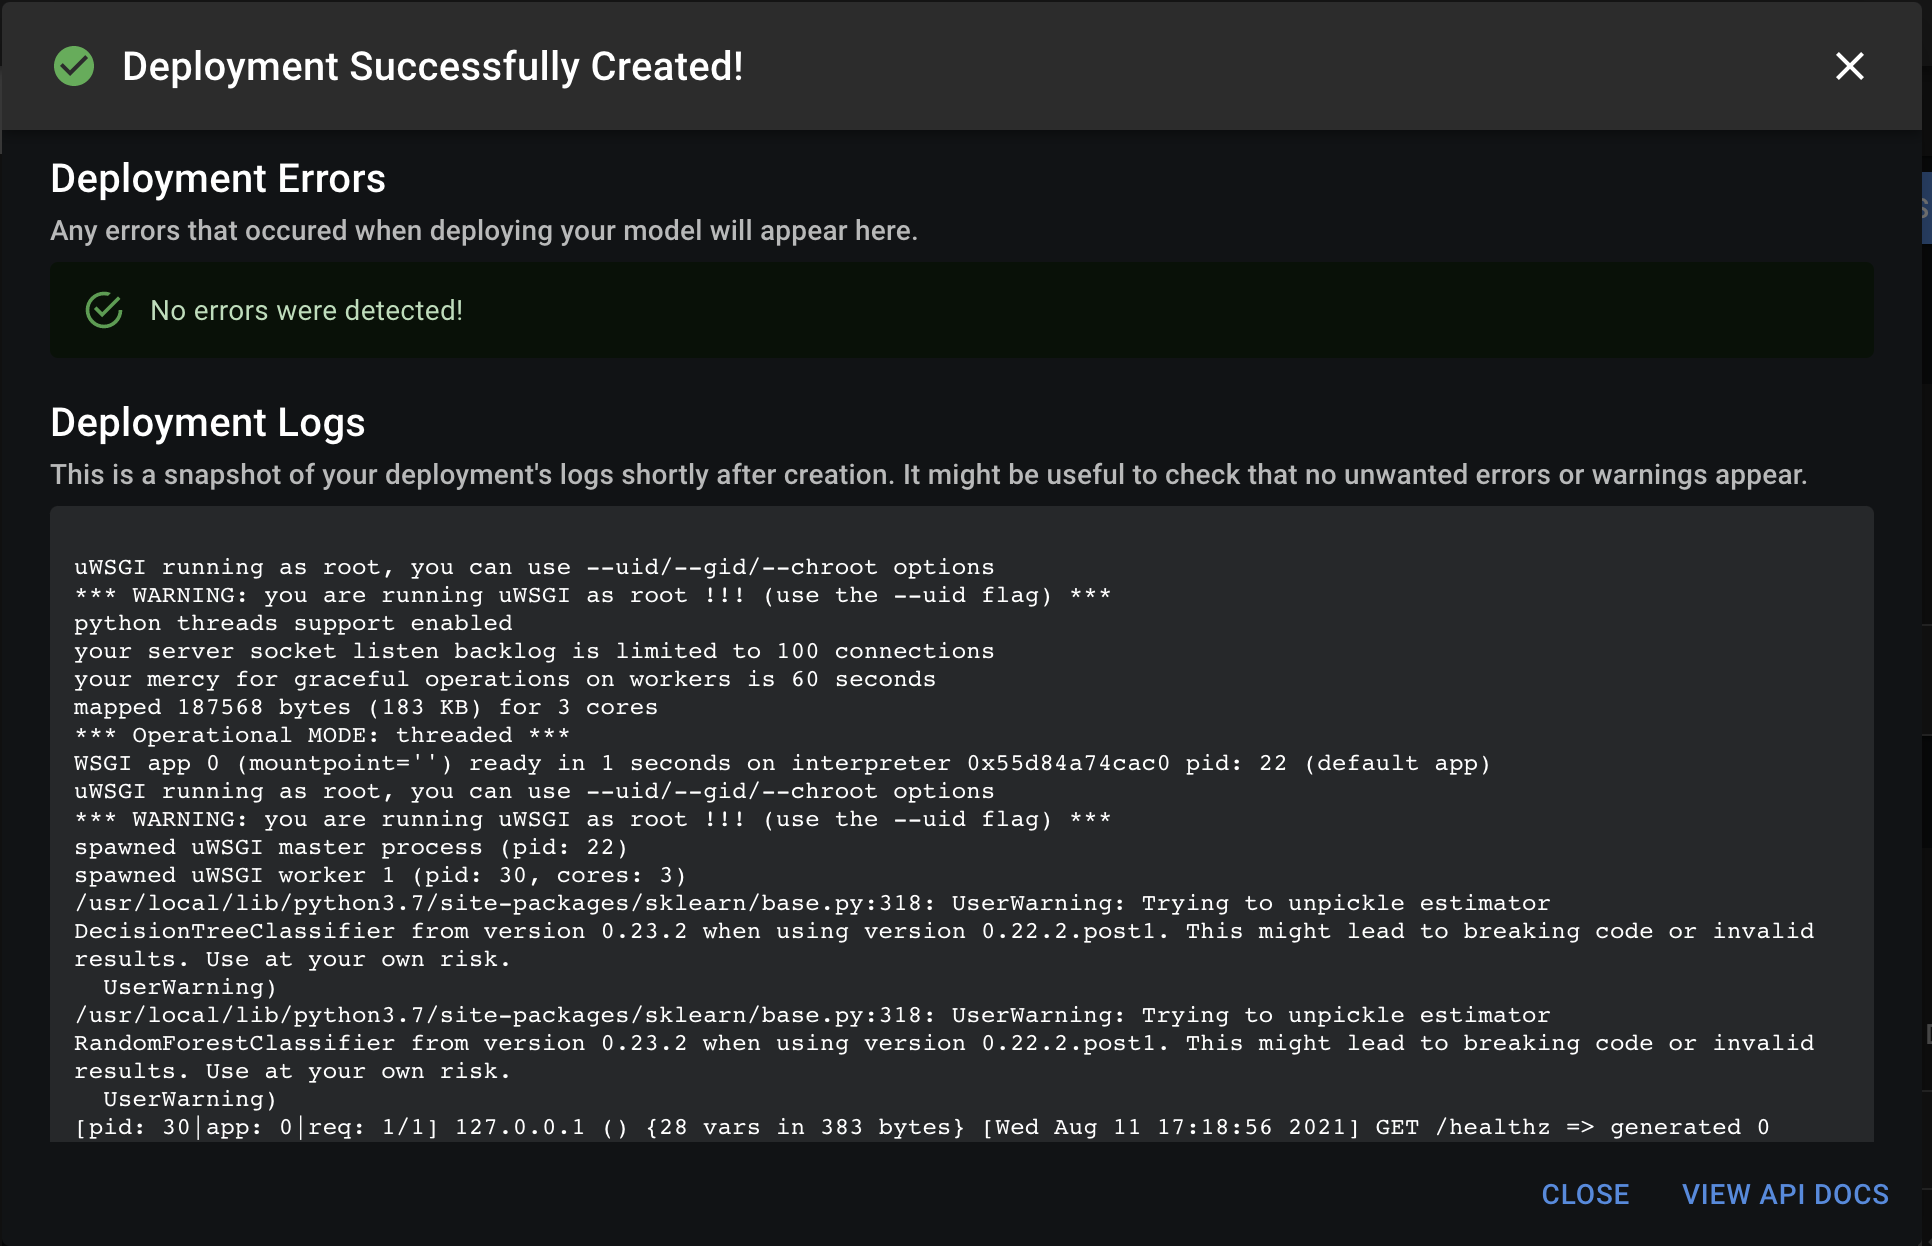
Deployment Success
When the deployment succeeds, a dialogue will appear showing a success message and logs.
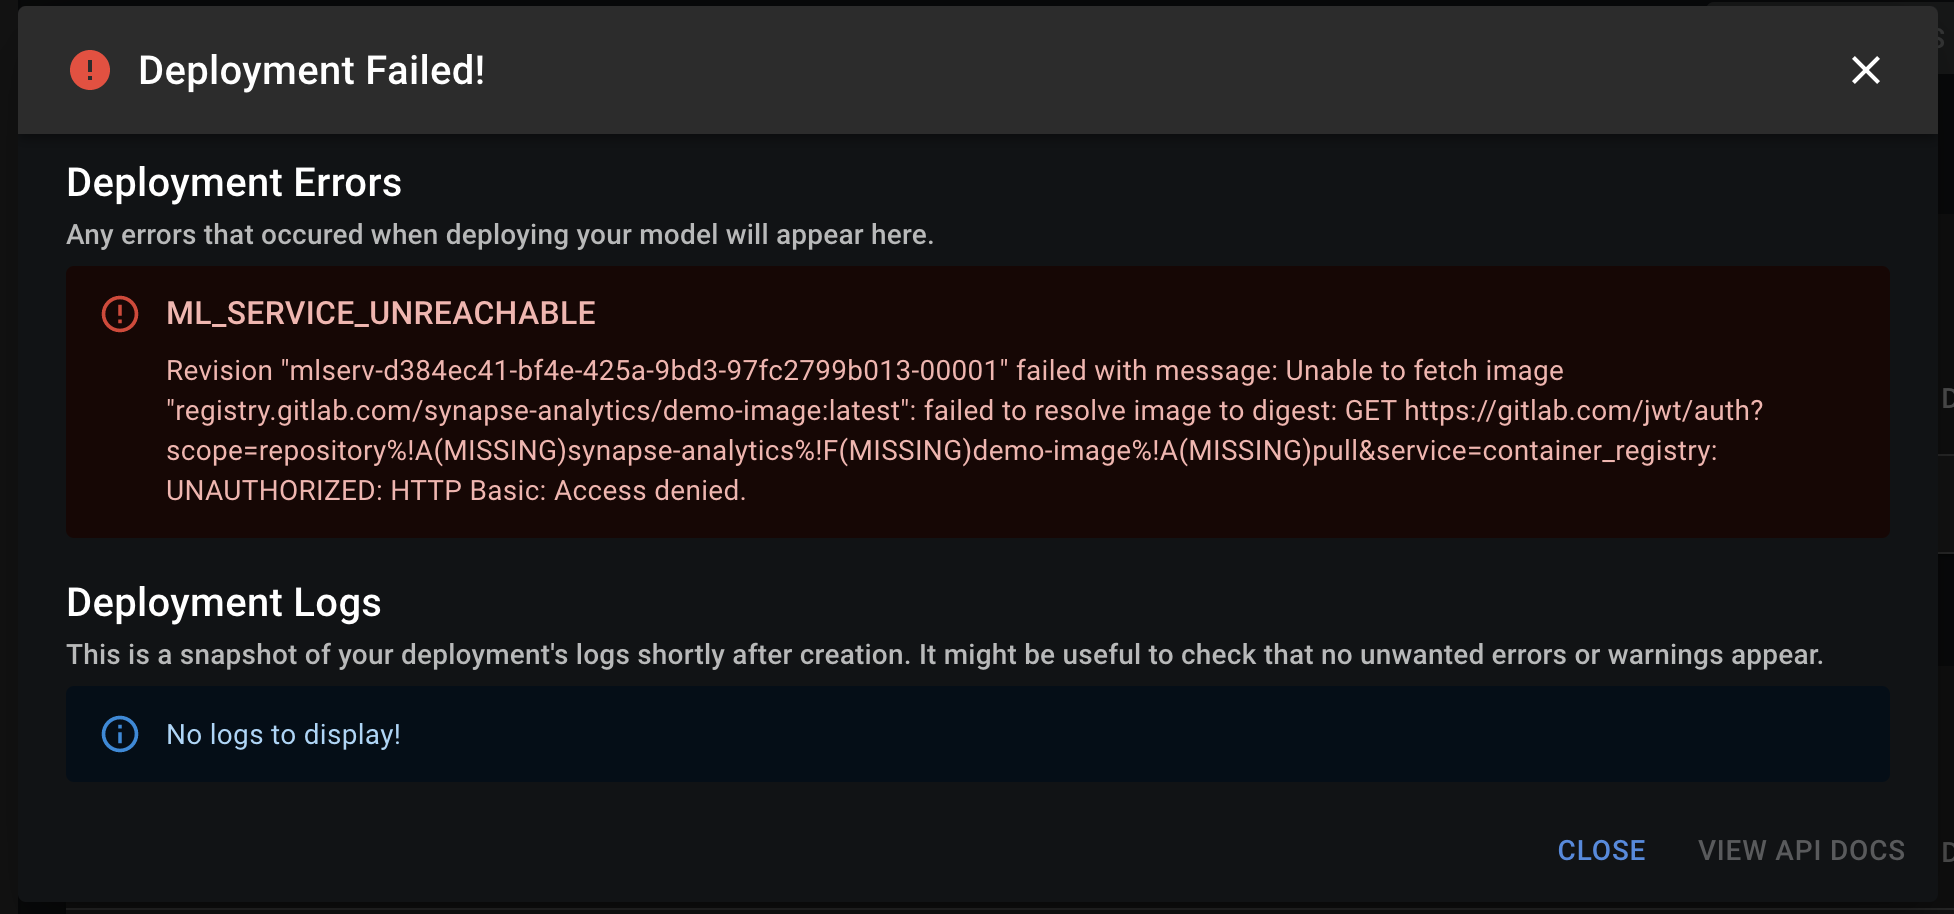
Deployment Failure
If the deployment fails, a dialogue will appear showing a failure message and logs (if any). Check the message and logs to debug the issue.
Troubleshooting deployment creation error:
If deployment fails, here are a few things you can check:
- Make sure the webserver has a
/healthzas described here. - Make sure the webserver's port is the same as the exposed port set when creating your deployment.
- Make sure the Image URL is valid. You can do so by running
docker pull <image_url>. - If the image url is protected by a username and password, try running
docker login <your_registry>and then runningdocker pull <image_url>. - Check the logs, sometimes the deployment message maybe irrelevant if something within your container is crashing, the logs will help capture that.
If none of the above works, feel free to contact us and we'll help you troubleshooting.
In the current version, the resource limits on a running container for a deployment are 1 CPU and 4G RAM. If your deployment goes over these limits, it will not be able to run on Konan.
In coming versions, users will have control over resource limits according to their needs.
Congratulations!! You've just deployed your first model on Konan!!
Head over to API Documentation to see the endpoints Konan automatically generated for your deployment or head on over to API Integration - Python to start integrating your model into your infrastructure!