Getting Started With Konan Templates
Overview
The purpose of this guide is to provide a complete walkthrough to get you started with Konan. The template provided aims to abstract a lot of the technicalities behind bootstrapping your first deployment before deploying it on Konan. You'll get acquainted with some key terminology, install some prerequisites, configure your environment, and finally create your first deployment.
Along the way, you might be introduced to new, scary-sounding technical terms like "containerization", "webservers" and "Makefile". However, fear not. The sections of this guide are tailored to provide you with a streamlined workflow, allowing you to focus on what matters, the logic of your model. You will not need to directly interact with any of these technologies aside from following specific and clear instructions.
This guide, and indeed all of Konan, is programming-language agnostic. This means that you can write your ML model in any language you prefer and still integrate it with Konan.
This guide will primarily focus on a python implementation. However, Konan can be integrated with any framework. If the programming language you intend to use is not currently supported in the template project, you can follow the Advanced Guide to see a detailed step-by-step guide to deploy your model on Konan.
Architectural Overview
You may think of Konan as the maestro of an orchestra or the director of a theatrical company. Konan facilitates and integrates several components required to achieve a functional and stable release of your machine learning model and its integration into a live system.
Konan interacts with 3 main actors to achieve such a flow.
- a machine learning model packaged into a deployment that exposes the
predict/endpoint, - a client-side system that uses Konan's rich APIs, and
- an end user who monitors and gains valuable insights through the
Konandashboard.
The focus of this guide is to take your model and turn it into a Konan-ready deployment. You will find other sections of this documentation hub useful in introducing you to the remaining of Konan's ecosystem.
Prerequisites
Before delving further into this guide, we strongly recommend that you ensure your local machine have working and stable Internet connectivity, install some packages, and configure your environment accordingly. This will allow you to step-through the guide as you read along.
In particular, make sure that you are set up with the following:
- git, the version control software,
- the containerization platform docker,
- your machine learning model, perhaps as source code or saved as a file.
Once you have the above installed and setup, feel free to continue with this guide. As a general view, to deploy your model to Konan and start integrating your systems with it, you need to:
- prepare your pre-trained model (should already be done),
- build a web server that adheres to Konan's API standards,
- wrap your webserver and model into a docker image, and publish it to a container registry, and
- use your Konan dashboard to deploy your image.
Cloning Our Template Deployments
Because at Konan we value your time, we have elected to provide a template repository with a suitable directory structure and ready-to-use scripts. It is with such files that you will use to achieve steps 1 and 2 of the above roadmap.
To clone this repo, open a Terminal or Powershell window and navigate to a directory in which you want to clone our konan-template-deployments repo. Then, type
git clone https://github.com/SynapseAnalytics/konan-template-deployments.git
Wait a few seconds, and you should see that your machine has finished cloning the repository, leaving you with a folder named konan-template-deployments inside your chosen directory. To validate that this operation has successfully completed, type
ls
and you should see the output containing konan-template-deployments
The repo is divided by folders named with some programming languages. In each folder, you will find a template structure fitting the corresponding programming language. We will primarily assume that you are using python in this guide, but it should be easy enough for you to adapt the guide to suit any other provided folder.
If the programming language you chose to write your model with doesn't already have a template folder, feel free to submit a request with the Github Issue Tracker.
If you are feeling particularly adventurous, maybe even consider helping out the community! Implement such template structure yourself and submit a Pull request on the repo for us to review and ultimately integrate. In that case, you may find the Contributing section of this documentation helpful.
Preparing Your Deployment
At this point, feel free to get acquainted with the directory structure of the konan-template-deployments repo. In particular, pay close attention to one of the folders titled with a programming language name. In this guide, we will use the python folder as an example.
Navigate into such folder now, and investigate its contents, by typing the commands
cd konan-template-deployments/python
ls
The tests/ and examples/ folders are self-explanatory, and we will use them later on this guide.
However, for now, we will focus on the following
- the
src/folder, including theserver.pyandretrain.pyfiles - the
retrain.shfile - the
artifacts/folder - the
requirements.txtfile - the
.konanfile - the
Dockerfileand.dockerignorefiles, and - the
Makefilefile
src/
In the src/ folder you will find two files, the server.py file and the retrain.py file.
src/server.py
First, let's investigate the server.py file. It is in this file that we will write the logic of your machine learning model.
Follow the steps outlined next to get your python code ready for deployment.
MyPredictionRequestThis class defines the schema of the input to your model's
predict/endpoint. Enter the names, types, and optional validators of the features required by your model.The
predict/API thatKonanwill expose for you for this deployment will pass such features through to your model, so ensure the accuracy and completeness of your features.class MyPredictionRequest(KonanServiceBasePredictionRequest):
"""Defines the schema of a prediction request
Follow the convention of <field_name>: <type_hint>
Check https://pydantic-docs.helpmanual.io/usage/models/ for more info
"""
# TODO: [1] Define your request schema
# Uncomment what you need and adjust their names and types
# Check https://pydantic-docs.helpmanual.io/usage/models/ for more data types
# sample_str: str
# sample_int: int
passMyPredictionResponseThis class defines the schema of the output of your model's
predict/endpoint. Enter the names and types of the response of your model.The
predict/API thatKonanwill expose for you for this deployment will return such outputs to the caller of the API, so ensure the accuracy and completeness of your features.class MyPredictionResponse(KonanServiceBasePredictionResponse):
"""Defines the schema of a prediction response
Follow the convention of <field_name>: <type_hint>
Check https://pydantic-docs.helpmanual.io/usage/models/ for more info
"""
# TODO: [2] Define your response schema
# Uncomment what you need and adjust their names and types
# Check https://pydantic-docs.helpmanual.io/usage/models/ for more data types
# sample_int: int
# sample_bool: bool
# sample_float: float
# sample_str: str
# sample_list_of_ints: List[int]
# sample_dict: Dict[str, Any]
# If you want your fields to be nested objects themselves
# class SampleObject(pydantic.BaseModel):
# sample_field_1: int
# sample_field_2: str
# sample_object: SampleObject
passnoteThe
MyPredictionResponseclass ultimately inherits frompydantic.BaseModel, so you may find this useful.MyModel.__init__()This class defines the actual machine learning model of your deployment. In the
__init__()method of the class, you can initialize your model.For example, you may read the model from a file and deserialize it, connect to an external database, or implement any other initialization logic.
def __init__(self):
   """Add logic to initialize your actual model here

   Maybe load weights, connect to a database, etc ..
   """
   super().__init__()
   # TODO: [3] Initialize your model
   # # For example, the following code will load a model saved as a model.pickle file in the models/ directory
   # import pickle
   # from konan_sdk.konan_service import constants as Konan_Constants
# self.loaded_model = pickle.load(open(f"{Konan_Constants.MODELS_DIR}/model.pickle", 'rb'))MyModel.predict()This method is the cornerstone of your entire deployment. Your
MyModelclass should expose apredict()method that implements the logic of your prediction. It takes a single input,req, which is the request data from theKonanAPI. Thepredict()method should then return the model's prediction, which will be the output returned by theKONANAPI.def predict(self, req: MyPredictionRequest) -> MyPredictionResponse:
"""Makes an intelligent prediction
Args:
req (MyPredictionRequest): raw request from API
Returns:
MyPredictionResponse: this will be the response returned by the API
"""
# TODO: [4] Implement your prediction logic
# Optionally preprocess the request here
# Use your logic to make a prediction
# Create a MyPredictionResponse object using kwargs
sample_prediction = MyPredictionResponse(
# sample_int=42,
# sample_bool=False,
# sample_float=0.68,
# sample_str="hello world",
# sample_list_of_ints=[10, 2, 3],
# sample_dict={
# 'key_1': 'value_1',
# 'key_2': 2,
# },
# sample_object=MyPredictionResponse.SampleObject(
# sample_field_1=1,
# sample_field_2='field_2',
# ),
)
# Optionally postprocess the prediction here
return sample_predictionMyModel.evaluate()For
konanto frequently evaluate your model, you need to define theMyModel.evaluate()method. At its essence, this method accepts aListcontaining past predictions generated by the model alongside their corresponding ground truth values. The method should then return an "evaluation" of the model's performance using a "metric".Check the documentation of
konan-sdkfor details on the implementation of theKonanServiceBaseEvaluateRequestandKonanServiceEvaluateResponseclasses.def evaluate(self, req: KonanServiceBaseEvaluateRequest) -> KonanServiceBaseEvaluateResponse:
"""Evaluates the model based on passed predictions and their ground truths
Args:
req (KonanServiceBaseEvaluateRequest): includes passed predictions and their ground truths
Returns:
KonanServiceEvaluateResponse: the evaluation(s) of the model based on some metrics
"""
# TODO: [5] Implement your evaluation logic
# Use your logic to make an evaluation
# Create a KonanServiceBaseEvaluateResponse object using kwargs
sample_evaluation = KonanServiceBaseEvaluateResponse(
# results should be a list of KonanServiceEvaluation objects
# define each KonanServiceEvaluation object using kwargs
results=[
# KonanServiceEvaluation(
# metric_name=KonanServicePredefinedMetricName.precision,
# metric_value=0.95,
# ),
# KonanServiceEvaluation(
# metric_name="custom-metric",
# metric_value=0.7,
# ),
],
)
return sample_evaluation
For more information, check the documentation of konan-sdk
The remaining of the server.py file should be left unchanged. However, if needed, you may include any other source code files in the src folder, write any helper classes and/or functions, import them in the server.py file, and use them accordingly.
retrain.py
Secondly, let's take a look at the retrain.py file. This python file should contain the code which implements your retraining logic. During the course of retraining, your code will have access to:
- your model's original artifacts,
- an (optional) training data
.csvfile, and - an (optional) serving data
.csvfile
Your retraining code should take advantage of those resources and produce new and improved model artifacts. These new artifacts will power your newly retrained Konan Model.
The constants defined at the beginning of the retrain.py file can be useful for reading and writing the above files.
RETRAINING_DIR_PATH = "/retraining"
METRICS_FILE_PATH = f"{RETRAINING_DIR_PATH}/metrics.json"
ARTIFACTS_DIR_PATH = f"{RETRAINING_DIR_PATH}/artifacts"
DATA_DIR_PATH = f"{RETRAINING_DIR_PATH}/data"
TRAINING_DATA_FILE_PATH = f"{DATA_DIR_PATH}/training.csv"
SERVING_DATA_FILE_PATH = f"{DATA_DIR_PATH}/serving.csv"
Follow the steps outlined next to get your python model ready for retraining.
Retrain your model and write the new artifacts
This is the core of the
retrain.pyscript, in which you will produce new artifacts for your model.# TODO: [1] retrain your model and generate the new weights
new_weights = "Amazing new weights" # replace this with your newly retrained weights
weights_file_name = "weights.txt" # This must EXACTLY match the name of the current weights file
with open(f"{ARTIFACTS_DIR_PATH}/{weights_file_name}", "w") as file:
file.write(new_weights)noteYou can repeat step [1] as many times as you want, particularly if you have multiple weights files. Obviously, you will need to supply different
weights_file_name(s)Expose your retraining metrics
Konancan help you and your organization in tracking the performance of your AI models, and this includes any retraining jobs run. For that, yourretrain.pyscript needs to write ametrics.jsonfile, with certain information written into it. This includes:- the train and test split of the data which you used for your retraining, and
- the evaluation of your new (retrained) model (including both training and testing evaluation)
# TODO: [2] write your retraining metrics dictionary
retraining_metrics = {
   'split': {
      'train': 0.8,
      'test': 0.2,
   },
   'evaluation': {
      'train': [
            {
               'metric_name': 'accuracy',
               'metric_value': 0.93,
            },
      ],
      'test': [
            {
               'metric_name': 'accuracy',
               'metric_value': 0.89,
            },
      ],
   },
}
with open(METRICS_FILE_PATH, 'w') as file:
   json.dump(retraining_metrics, file)
retrain.sh
This file includes the actual command which will trigger your retraining pipeline whenever Konan retrains your model. The command included in this shell script file should simply run your retraining script file.
If you are using the konan-template-deployments and are writing your model in python, then you won't need to adjust it in any way. Otherwise, simply write a command that should invoke your retraining pipeline.
artifacts/
It is expected that you include any artifacts files needed inside this folder. The path to this folder inside the deployment image will be available to your code and scripts in the KONAN_SERVICE_ARTIFACTS_DIR environment variable.
For further details about how to access the KONAN_SERVICE_ARTIFACTS_DIR environment variable, and any files added in it, consult the README.md file provided inside it.
requirements.txt
This file lists the python packages required by the server.py code. It is already filled with some necessary packages that the webserver will need. Feel free to append the names of the packages required by your model at the end of the existing list.
The python packages listed in this file will be automatically installed inside your deployment image.
konan-sdk
# Add your python requirements here
.konan
The .konan file contains key environment variables needed by our automatic tool to generate your deployment configured correctly for you. Set the following variables correctly in the .konan file and save it.
| Variable Name | Type | Required? | Default | Description |
|---|---|---|---|---|
KONAN_CONTAINER_REGISTRY | string | YES | The URL of the container registry to push the image to. For example, docker.io, quai.io, or konancr.azurecr.io | |
KONAN_CONTAINER_REGISTRY_USERNAME | string | YES | The username of the above container registry's credentials (check note below) | |
KONAN_CONTAINER_REGISTRY_PASSWORD | string | YES | The password of the above container registry's credentials (check note below) | |
KONAN_CONTAINER_REGISTRY_NAMESPACE | string | if KONAN_CONTAINER_REGISTRY is konancr.azurecr.io | KONAN_CONTAINER_REGISTRY_USERNAME | Container registry namespace (check note below) |
KONAN_APP_NAME | string | YES | The name to use for the deployment image | |
KONAN_APP_VERSION | string | YES | The version to tag the deployment image with |
If electing to use Konan's container registry, then you can retrieve the correct KONAN_CONTAINER_REGISTRY_USERNAME, KONAN_CONTAINER_REGISTRY_PASSWORD, and KONAN_CONTAINER_REGISTRY_NAMESPACE by logging into your dashboard and navigating into the KCR tab.
Dockerfile and .dockerignore
The docker containerization platform will use those files to know the recipe to follow in order to create the image for your deployment.
For the most part, and unless you'd like to delve into some advanced configurations, you won't need to modify any of those files.
Makefile
This file will help the make script generate and push your deployment image, helped with configurations variable in the .konan file.
For the most part, and unless you'd like to delve into some advanced configurations, you won't need to modify this file.
Building and Pushing the Deployment Image
Firstly, ensure that you have followed the previous section in modifying the provided template files and folders accordingly. Once you have double checked that all your files are in order, return to this section.
In your Terminal or Powershell window, ensure that you are in the root of the python folder by using the command
ls
For example, look for Makefile in the output.
Indeed we will use the make command and the Makefile file to generate the image, To familiarize yourself with the possible make subcommands our Makefile exports, you may use the command
make help
You should see an output similar to the following
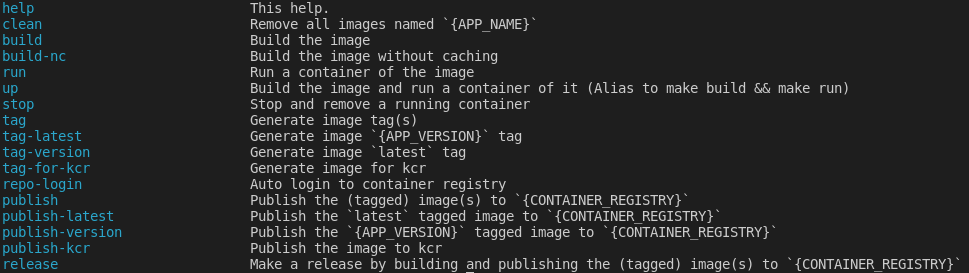
We will use a streamlined command to automate the entire pipeline. To build and release the image, use the command
make release
and go grab a cup of your favorite hot drink while you wait for docker to finish building the image, and for your system to push the image to your chosen container registry
If an error has occurred with building and releasing the image, trace back the messages printed to debug the issue.
If you'd prefer, you can also elect to manually step through the pipeline by using the following commands. This can also help with your debugging session, if needed.
make build-nc # builds the deployment image using the configuration file .konan and the Dockerfile and .dockerignore files
make tag # Correctly tag your built image, depending on whether you chose KCR or something else
make repo-login # If you'd prefer to login yourself, you can substitute this line with the command `docker login`
make publish # publish your tagged image to your chosen container registry
Optionally, you may want to run the command
make clean
to remove the docker image from your local system to retrieve some valuable disc space.
With an image pushed to your chosen container registry, you may now head to Deploying on Konan to get your first deployment ready.